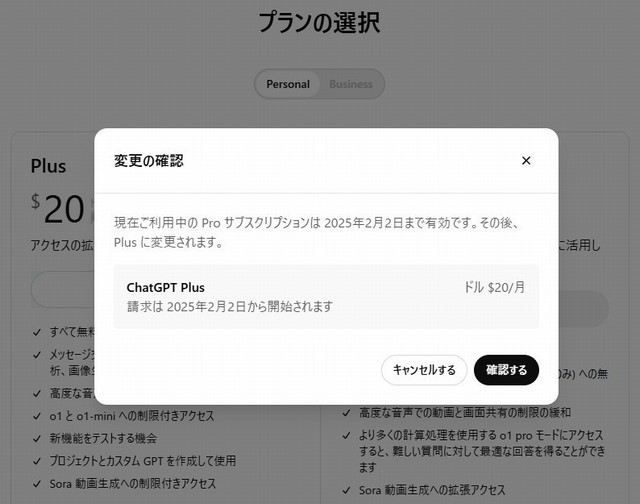
 ChatGPTの契約内容を見直しました。月額3.6万円の「pro」を解約し、月額3000円の「plus」にグレードダウンしました。それでも本日(2月1日)から「o3」シリーズが使えるようになりましたので、ChatGPTは高性能なままです。
今日は新しく使えるようになったこの「o3」シリーズについて説明します。
ChatGPTのAIモデルは多様化しています
2月1日から推論が強化されたo3シリーズを使えます
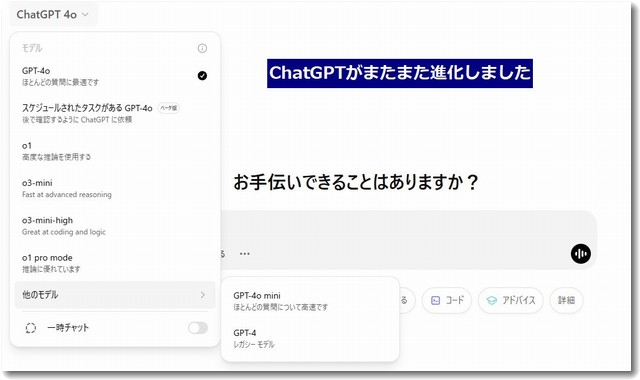
上記の画面は、pro契約している状態のものなので「o1 pro mode」が表示されています。たしかに「o1 pro mode」は素晴らしいのですが、私の利用頻度では月額3.6万円は少し高額です。
そこで、月額3000円で使える「plus」のコースに変更しました。
plusコースなら本日から「o3」シリーズが使えるので、私の環境ではこれで十分かもしれません。しばらくこの状況で使ってみます。
最新AIモデル「o3シリーズ」とは?—特長や活用メリットを解説
AI技術は日々進化を遂げています。その中で、OpenAIが開発したChatGPTの「o3シリーズ」が2月1日から使えるようになりました。
従来のGPT-3.5やGPT-4を超える高性能な言語モデルとして注目を集めています。本記事では、o3シリーズの特長や、実際にどのように活用できるのかを分かりやすく解説します。
o3シリーズの特長とは?
o3シリーズは、AIの処理速度や効率性を向上させ、さまざまな用途で活用できるように設計されています。主な特長は以下のとおりです。
1. 高速処理
• これまでのAIモデルと比べて応答速度が大幅に向上しました。
• リアルタイムでの対話や、大量のデータ処理にも適しています。
2. 高い効率性
• 計算リソースの使用を最適化し、少ないエネルギーで高性能を発揮します。
• 環境負荷を抑える工夫もされています。
3. 多様なモデルサイズ
• 用途に応じて、「o3-mini」から「o3-large」 まで異なるサイズのモデルが用意されています。
• 必要な処理能力に応じて最適なモデルを選択できます。
4. マルチモーダル対応
• テキストだけでなく、画像や音声など複数の情報を統合して処理できる可能性があります。
5. 高度な文脈理解
• 長い会話や文章でも一貫した内容を理解し、適切な応答を生成できます。
o3シリーズを活用するメリット
o3シリーズを導入することで、さまざまな分野で業務効率の向上や新しい可能性を生み出すことができます。特に以下のようなメリットがあります。
1. 生産性の向上
• 応答が速いため、作業の待ち時間を短縮できます。
• 複雑なタスクも短時間で完了し、業務の効率化につながります。
2. コスト削減
• 高速処理が可能なため、APIの使用コストを抑えられる可能性があります。
3. 幅広い用途への適用
• 文書作成、データ分析、顧客サポートなど、さまざまな業務に活用できます。
4. 柔軟なカスタマイズ
• モデルサイズを選択できるため、業務内容に最適な性能を確保できます。
5. AIを活用した新しいサービス開発
• 高度な言語処理能力を活かして、革新的なAIサービスやアプリケーションを開発することが可能です。
o3シリーズが得意とする分野
o3シリーズは、特に以下のような場面でその強みを発揮します。
1. 計算や開発の支援
• AIによるコード生成やデバッグ支援が可能。
• アルゴリズムの最適化にも活用できます。
2. APIとしての利用
• 低遅延(レイテンシー)で高速な応答が可能。
• 大量のリクエスト処理に適しており、スケーラブルな運用が可能です。
3. 文章作成・リライト
• 高い言語生成能力を活かして、ブログ記事や報告書の作成をサポート。
• AIによる迅速な文章のリライトも可能です。
4. データ分析と洞察生成
• 大量のデータを高速処理し、ビジネスインテリジェンスや市場分析に活用できます。
5. リアルタイム対話システム
• 自然な会話の流れを維持しながら、複雑な質問にも対応可能。
• チャットボットや音声アシスタントの開発に最適です。
6. マルチモーダル対応
• テキストと画像、音声を組み合わせた情報処理が可能で、より高度なタスクに対応できる可能性があります。
o3シリーズの活用によるビジネスの可能性
特に経営者の視点から見ると、o3シリーズは以下のような場面で役立ちます。
• 迅速なデータ分析とレポート作成
• ビジネスモデルのシミュレーションや市場予測
• リアルタイムデータ分析による意思決定の支援
• AIを活用した顧客対応や業務の自動化
このように、o3シリーズを導入することで、企業の競争力を強化し、より質の高いサービスを提供することが可能になります。
o3シリーズについてのまとめ
o3シリーズは、高速処理・高効率・多様な用途対応といった特長を持つ最新のAIモデルです。特に、リアルタイム処理やマルチモーダル対応が求められる分野での活用が期待されます。
「業務の効率化を図りたい」「新しいAI活用方法を模索している」という方は、o3シリーズの導入を検討してみてはいかがでしょうか?
o3miniを使ってプログラムコードを書いてみました
WEBでのシールの見積システムを作成
ちょっとしたプログラムならすぐにできるのがo3-miniのすごいところです。そこで、o3を使って、簡単なシール印刷の見積もりシステムを作成してみました。

上記のページは、すべてChatGPT「o3-mini-high」とのやりとりだけで作成したphpです。
WEBサイトに簡易な見積システムを載せたいです。
ワードプレスで構築されているドメインですので、見積ページは静的htmlか、phpで作りたいです。
見積のアルゴリズムを伝えれば作ってもらえますか?
見積システムの要件を分解して、必要なステップを明確にする。まず、静的HTMLまたはPHPでの作成を検討し、ワードプレスの環境に合わせた統合方法も検討中。
作りたいのは印刷物の見積システムです。
必要な入力項目は
サイズ 縦何センチ、横何センチ
制限は1センチから100センチまでの範囲なら自由です。
なお、枚数に関しては、100枚から1万くらいまでをシミュレーションとして、金額と単価を表示し、その表とグラフを表示してください。
計算方法は、以下のとおり
1枚の原反があり、その単位ごとに取れる枚数を希望サイズから計算する
現反のサイズは100センチ×100センチで、このサイズ内に収まるようにする
現反1枚あたり1万円とする
印刷費用の計算は、版代として、モノクロ印刷なら5000円、カラー(4色)印刷なら15000円
印刷単価は現反一枚あたりで、モノクロなら2000円、カラーなら8000円
とりあえずこのような基礎データでページ作成できますか?
Laying out the options
OK, let’s gather info on inputting print size (minimum 1-100 cm) and copy count (100-10,000). Thinking about a price table and graph for the calculated cost.
Mapping print costs
I’m considering 100×100 cm sheets, priced at 10,000 yen each. Printing involves a plate-making fee (5000 yen for monochrome, 15000 yen for color) plus a per-sheet cost (2000 yen for monochrome, 8000 yen for color).
Figuring out print configurations
I’m calculating copies per 100×100 cm sheet, using a grid pattern to prevent rotation. This involves mapping out specific sizes and quantities.
Mapping print layout
I’m arranging copies within a 100×100 cm sheet. Calculating the number of copies involves integer division along width and height, assuming each piece must fit without rotation.
Piecing together the costs
I’m mapping out the total cost for printing, including raw sheet, plate, and printing unit costs. Each will be calculated based on the specific requirements of the print job.
Breaking down costs
I’m calculating the total printing costs, including raw sheet, plate, and printing unit costs, based on the specific requirements of the print job.
Summing up expenses
I’m pulling together the total printing costs, factoring in raw sheet, plate, and printing unit costs for each print job, based on the specific size and type required.
Determining print costs
I’m outlining the print costs by establishing the number of copies per original sheet based on the desired size, assuming no rotation for simplicity.
Calculating total cost
I’m talling the overall printing expense by summing the raw sheet cost, printing unit price, and plate cost for each print job, avoiding rotation complexity.
Breaking down the costs
Breaking down the total cost into a table with headings for copies, total price, and unit price. Additionally, showcasing the cost implications of each type of printing.
Simulating print costs
I’m setting up a system to simulate printing costs by allowing users to input print sizes and quantities. The results will be displayed in tables and graphs on a WordPress page.
Crafting the form
I’m assembling a PHP sample code with an HTML form to input vertical and horizontal sizes, select printing mode, and simulate various copy counts to display simulated data clearly.
Simulating print costs
I’m calculating print costs for 100 to 10000 copies, iterating through 100 increments. Needs clarification on input sizes and print modes for accurate calculations.
Calculating costs
I’m mapping out the process, including verifying sheet quantities, determining total and unit costs, and safeguarding against oversized inputs with customized error triggered for validation.
Ensuring accurate input
OK, let me see. By setting a min=1 and max=100 input range, inputs fall within this range. This approach balances precision with flexibility.
Building a PHP file
I’m creating a PHP+HTML file for a WordPress page, ensuring it’s clear, well-commented, and follows the “ですます調” style, including a form for user input.
Ensuring accurate data
I’m ensuring form submissions are validated, accurately displaying a table and graph. Error messages are triggered for missed or invalid inputs, maintaining data integrity.
Integrating form and data
Connecting PHP and HTML, this code establishes a form for user input. Upon submission, it validates the data, computes costs, and dynamically creates a table and graph using Chart.js.
ということで、phpのコードが作成できました。いちおう、以下にできたコードを掲載しておきますね。
<?php
// エラー表示(開発時のみ有効にしてください)
// ini_set(‘display_errors’, 1);
// ini_set(‘display_startup_errors’, 1);
// error_reporting(E_ALL);$error = “”;
$simulation_data = array();if ($_SERVER[“REQUEST_METHOD”] == “POST”) {
// 入力値を取得
$vertical = isset($_POST[‘vertical’]) ? floatval($_POST[‘vertical’]) : 0;
$horizontal = isset($_POST[‘horizontal’]) ? floatval($_POST[‘horizontal’]) : 0;
$print_mode = isset($_POST[‘print_mode’]) ? $_POST[‘print_mode’] : ‘monochrome’;// 入力チェック(1~100cm)
if ($vertical < 1 || $vertical > 100 || $horizontal < 1 || $horizontal > 100) {
$error = “サイズは1~100センチの範囲で指定してください。”;
} else {
// 100cm×100cmの現反内に収まるコピー数を計算(単純に整数で割る)
$copies_per_sheet = floor(100 / $vertical) * floor(100 / $horizontal);
if ($copies_per_sheet <= 0) {
$error = “指定されたサイズでは、100cm×100cmの現反内に収まる枚数が0枚となります。サイズを変更してください。”;
} else {
// 印刷モードごとの費用設定
if ($print_mode == ‘color’) {
$plate_fee = 15000; // 版代(カラーの場合)
$printing_unit_cost = 8000; // 印刷単価(カラーの場合、現反1枚あたり)
} else {
$plate_fee = 5000; // 版代(モノクロの場合)
$printing_unit_cost = 2000; // 印刷単価(モノクロの場合、現反1枚あたり)
}
$sheet_cost = 10000; // 現反1枚あたりの原紙費用
// 現反1枚あたりの合計費用(原紙費+印刷単価)
$cost_per_sheet = $sheet_cost + $printing_unit_cost;// 100枚~10000枚まで(100枚刻み)でシミュレーション
for ($copies = 100; $copies <= 10000; $copies += 100) {
// 必要な現反枚数(切り上げ)
$sheets_needed = ceil($copies / $copies_per_sheet);
// 合計金額:版代(1回分)+(必要な現反枚数×現反1枚あたりの費用)
$total_cost = $plate_fee + $sheets_needed * $cost_per_sheet;
// 単価(1枚あたりの金額)
$unit_cost = $total_cost / $copies;$simulation_data[] = array(
‘copies’ => $copies,
‘sheets_needed’=> $sheets_needed,
‘total_cost’ => $total_cost,
‘unit_cost’ => $unit_cost
);
}
}
}
}
?>
<!DOCTYPE html>
<html lang=”ja”>
<head>
<meta charset=”UTF-8″>
<title>印刷物見積システム</title>
<!– Chart.js の読み込み –>
<script src=”https://cdn.jsdelivr.net/npm/chart.js”></script>
<style>
body { font-family: Arial, sans-serif; }
table { border-collapse: collapse; margin-top: 20px; }
th, td { padding: 8px 12px; border: 1px solid #ccc; text-align: center; }
.error { color: red; }
</style>
</head>
<body>
<h1>印刷物見積システム</h1><form method=”post” action=””>
<label for=”vertical”>縦のサイズ(cm):</label>
<input type=”number” id=”vertical” name=”vertical” min=”1″ max=”100″ required value=”<?php echo isset($vertical) ? $vertical : ”; ?>”><br><br><label for=”horizontal”>横のサイズ(cm):</label>
<input type=”number” id=”horizontal” name=”horizontal” min=”1″ max=”100″ required value=”<?php echo isset($horizontal) ? $horizontal : ”; ?>”><br><br><label>印刷モード:</label>
<input type=”radio” id=”monochrome” name=”print_mode” value=”monochrome” <?php if (!isset($print_mode) || $print_mode == ‘monochrome’) echo ‘checked’; ?>>
<label for=”monochrome”>モノクロ</label>
<input type=”radio” id=”color” name=”print_mode” value=”color” <?php if (isset($print_mode) && $print_mode == ‘color’) echo ‘checked’; ?>>
<label for=”color”>カラー</label><br><br><input type=”submit” value=”見積もる”>
</form><?php if (!empty($error)): ?>
<p class=”error”><?php echo $error; ?></p>
<?php endif; ?><?php if (!empty($simulation_data) && empty($error)): ?>
<h2>見積結果</h2>
<p>【現反内に収まるコピー数】 <?php echo $copies_per_sheet; ?> 枚</p>
<table>
<tr>
<th>枚数</th>
<th>必要な現反枚数</th>
<th>合計金額 (円)</th>
<th>単価 (円)</th>
</tr>
<?php foreach ($simulation_data as $data): ?>
<tr>
<td><?php echo $data[‘copies’]; ?></td>
<td><?php echo $data[‘sheets_needed’]; ?></td>
<td><?php echo number_format($data[‘total_cost’]); ?></td>
<td><?php echo number_format($data[‘unit_cost’], 2); ?></td>
</tr>
<?php endforeach; ?>
</table><!– グラフの表示 –>
<canvas id=”costChart” width=”800″ height=”400″></canvas>
<script>
// PHPのシミュレーション結果をJavaScriptの変数に変換
const simulationData = <?php echo json_encode($simulation_data); ?>;
const labels = simulationData.map(item => item.copies);
const totalCosts = simulationData.map(item => item.total_cost);
const unitCosts = simulationData.map(item => item.unit_cost);const ctx = document.getElementById(‘costChart’).getContext(‘2d’);
const costChart = new Chart(ctx, {
type: ‘line’,
data: {
labels: labels,
datasets: [
{
label: ‘合計金額 (円)’,
data: totalCosts,
borderColor: ‘blue’,
yAxisID: ‘y’,
fill: false,
},
{
label: ‘単価 (円)’,
data: unitCosts,
borderColor: ‘red’,
yAxisID: ‘y1’,
fill: false,
}
] },
options: {
scales: {
y: {
type: ‘linear’,
position: ‘left’,
title: {
display: true,
text: ‘合計金額 (円)’
},
},
y1: {
type: ‘linear’,
position: ‘right’,
title: {
display: true,
text: ‘単価 (円)’
},
grid: {
drawOnChartArea: false,
},
}
}
}
});
</script>
<?php endif; ?></body>
</html>
できたページ(plan.php)はこれです
再掲になりますが、できあがったページはこれです。
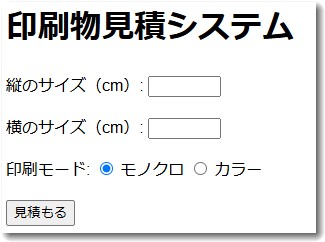
縦のサイズ、横のサイズを入力し、印刷モードをモノクロかカラーかを選択し、「見積もる」というボタンをクリックすると計算結果が表示されます。
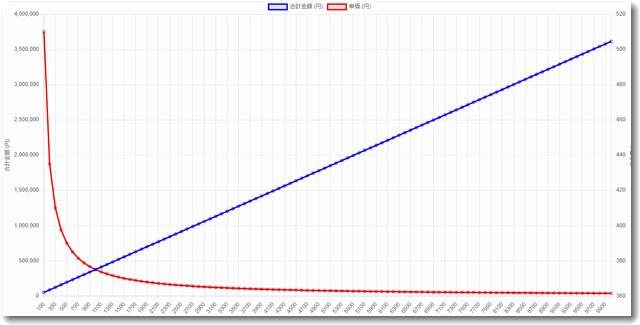
▼見積結果
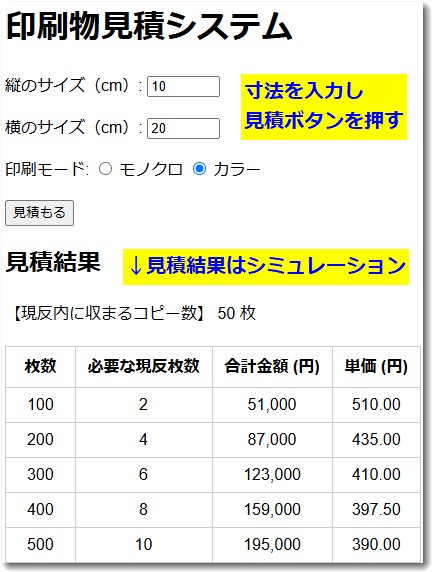
▼単価と金額のグラフを表示します
このコードをテキストエディタでファイルにしutf8形式で保存しました。その後に、FTPでサーバーにアップロードしただけす。それだけでちゃんと見積システムが動きました。
まだまだ工夫して改善したいところはいろいろとありますが、まずはサクッとここまで10分ほどで作成できたということが重要です。
この内容をさらに修正したい場合は、上記のコードをコピペでChatGPTの「o3-mini-high」に貼り付けて、どのような機能をつけたいのかとか、計算方法の変更とか、をリクエストすればできると思います。
ご自由にお使いください。

この記事を書いた遠田幹雄は中小企業診断士です
遠田幹雄は経営コンサルティング企業の株式会社ドモドモコーポレーション代表取締役。石川県かほく市に本社があり金沢市を中心とした北陸三県を主な活動エリアとする経営コンサルタントです。
小規模事業者や中小企業を対象として、経営戦略立案とその後の実行支援、商品開発、販路拡大、マーケティング、ブランド構築等に係る総合的なコンサルティング活動を展開しています。実際にはWEBマーケティングやIT系のご依頼が多いです。
民民での直接契約を中心としていますが、商工三団体などの支援機関が主催するセミナー講師を年間数十回担当したり、支援機関の専門家派遣や中小企業基盤整備機構の経営窓口相談に対応したりもしています。
保有資格:中小企業診断士、情報処理技術者など
会社概要およびプロフィールは株式会社ドモドモコーポレーションの会社案内にて紹介していますので興味ある方はご覧ください。
お問い合わせは電話ではなくお問い合わせフォームからメールにておねがいします。新規の電話番号からの電話は受信しないことにしていますのでご了承ください。
【反応していただけると喜びます(笑)】
記事内容が役にたったとか共感したとかで、なにか反応をしたいという場合はTwitterやフェイスブックなどのSNSで反応いただけるとうれしいです。
遠田幹雄が利用しているSNSは以下のとおりです。
facebook https://www.facebook.com/tohdamikio
ツイッター https://twitter.com/tohdamikio
LINE https://lin.ee/igN7saM
チャットワーク https://www.chatwork.com/tohda
また、投げ銭システムも用意しましたのでお気持ちがあればクレジット決済などでもお支払いいただけます。
※投げ銭はスクエアの「寄付」というシステムに変更しています(2025年1月6日)
※投げ銭は100円からOKです。シャレですので笑ってください(笑)